Get your project estimate
Find Pros
Exterior Renovation

Roof flashing - Why do you need it, and how can you install it yourself?

If you're getting ready for a roof replacement project, you've probably come across the term "flashing." What does it mean? What purpose does a roof flashing serve? What areas of the roof need flashing? And, finally, how to install it without professional assistance? These and other questions are most common among aspiring roofers, and you will find answers to them in this article. We strived to detail every stage of the roof replacement process, including flashing installation. Knowing how this vital element of the roofing system works, you will ensure its proper service and longevity. With the MyHomeQuote contractor-matching platform, you can easily find a trustworthy roofing crew who will guarantee airtight flashing installation. However, learning the theory won't go amiss if you feel like accomplishing this task yourself. Read on to get comprehensive information about roof flashing and its role in protecting your entire home.

Roof flashing - Why do you need it, and how can you install it yourself?

Table of contents

  1. What is roof flashing?
  2. What are the critical areas of the roof that require flashing?
  3. The best materials for roof flashing
  4. The key roof flashing types and their features
  5. Primary techniques that are involved in flashing installation
  6. How to install roof flashing?
  7. Why hire a certified expert to install roof flashing?

When we replace or build the roof from scratch, we expect it to last for years with minimal upkeep. However, this part of the house is most vulnerable to external factors, so its service life is limited and depends on installation quality, roofing material, and insulation. When at least one condition is not met, the roof might become a victim of water damage. 

Today we will talk about flashing, the most commonly overlooked roof component that has paramount importance for keeping a house structure intact. While directing the water away from vulnerable areas of the roof, flashing serves to seal the outer envelope, preventing leakage. No water should penetrate your roof deck, and a properly-installed flashing is the best way to ensure it.

Continue reading to find out more about the critical areas of the roof that should be protected with flashing. Besides, this article dwells on flashing materials and techniques as well as DIY installation tips and more. 

What is roof flashing?

The word flashing means both a method and an element that prevents water from entering a roof structure. Flashing is commonly made from thin metal or plastic and covers the most vulnerable roof areas like joints and penetrable sections. It directs water away from possible entry points, ensuring proper roof insulation.

No matter your roof construction or material, it won't serve the claimed number of years without flashing. The thin strips of impervious material installed in areas where the roof intersects with projections are pivotal for protecting a home's structure. Flashing creates a so-called weather-resistant envelope that keeps moisture out of the roof. 

What are the critical areas of the roof that require flashing?

Flashing helps extend the roof's service life and avoids costly repairs related to moisture damage. It keeps water from getting underneath the shingles, directing its flow down. Some areas of the roof are more moisture-prone than others. These are the roof's eaves, valleys, skylights, vents, front walls, and sidewalls. See below for more details on the critical areas that require roof flashing: 

  • Chimney. It's essential to place flashing at the chimney and the roof intersection to create a waterproof seal. Chimney flashing comprises a few parts, including a step flashing set under the roof's shingles and a counter flashing placed in the chimney's mortar joints. The purpose of installing flashing around the chimneys is to allow rainwater and melt snow to run off freely without building up on the roof.
  • Dormer. This functional element is built into the wall or a sloping roof to add headroom inside the house. As a dormer creates intersections between a roof and a wall, it's considered a potential water penetration area that should be sealed to prevent leakage. There're a few options on how to install dormer flashing. You can either set a strip around the ledge and underneath the roofing material or install a few metal pieces added between every row of shingles.
  • Skylight. In simple terms, a skylight is a roof opening covered with translucent or transparent glass. It might be fixed or vented, depending on the requirements. Flashing is needed to weatherproof the junction between the skylight and the roof shingles. It is installed around the skylight to protect this vulnerable roof area from the elements. 
  • Vents. Hoods and pipes come into the category of roof vents. To install them, you need to cut a hole into the roof in the form of a vent. Any roof unevenness creates a potential leakage hazard and should be covered with flashing. Place flashing underneath the shingles and above them, and then seal the construction for better results.

Use MyHomeQuote To Hire Local Roofing Companies

Invest in roof renovation to ensure your building's structural safety and enhance its curb appeal

REQUEST A QUOTE
Use MyHomeQuote To Hire Local Roofing Companies

The best materials for roof flashing

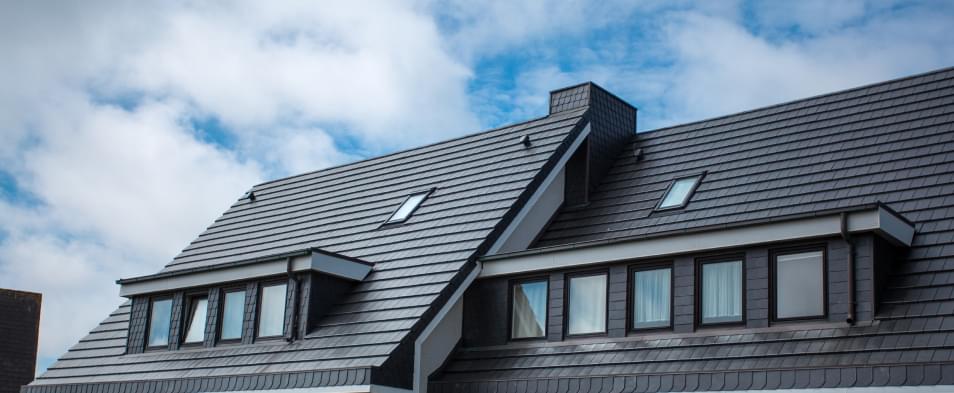
Flashing can be manufactured from almost all waterproof materials. However, the preference is given to lightweight and flexible ones like copper, lead, aluminum, and sheet flashing. These materials are durable and easily bent, making them best for covering the crevices of a roof structure. Some roofers also use plastic and rubber as the cheaper alternatives to metal flashing. These materials are available in a membrane and roll roofing.

When selecting the right flashings for the roof, consider their compatibility with the primary covering material. Matching incompatible materials like zinc and lead often results in galvanic corrosion, one of the leading causes of premature roof deterioration. The local building codes should also be considered when it comes to selecting the right flashing material. They specify the minimum required thickness of the metal to cover the roof's vulnerable areas. 

The key roof flashing types and their features

You're probably unaware of the existing flashing types if you're new to roofing. They differ from each other by the area of installation. However, what they have in common is the function of directing the water off of the rooftop. Below you will find the most widely used types of flashing on the roof and their specifics:

  • Step flashing. This type of flashing is used around functional roof elements like skylights and chimneys. It has a rectangular form and is made of short metal pieces installed in layers with shingles to direct water from areas where the roof meets a vertical surface. Thanks to the scale-like flashing pieces arrangement and roofing cement under each flashing step, the roof remains waterproof no matter the abundance of rainfall. 
  • Base flashing. The two-part flashing is made of a watertight membrane and has upturned edges, protecting the space between a sloping roof and a vertical surface. It directs water away from the roof surface to a rain gutter and ensures system waterproofing due to constant expansion and contraction.
  • Continuous flashing. You may also come across the term "apron flashing," which points to the same roofing element. Continuous flashing constitutes an extended, single piece of metal used to direct rainwater down the roof, preventing its accumulation on shingles. If it's not complemented with expansion joints, this leakage protection element might have trouble expanding and contracting with the home's structure.
  • Drip edge. This drainage element is mounted at the roof's edges to create a seal around them and direct water away from the house. It protects the decking from moisture that can penetrate it from the overfilled rain gutters. Consider installing drip edges as a non-insulated fascia board can quickly become a victim of mildew and rot. 
  • Valley flashing. This type of flashing for the roof is named after its location. It is placed in the area where two slopes are met at a joint and runs down to the drip edge. Valley flashing protects the most leakage-prone areas of the roof, directing rainwater away and preventing shingles from eroding and further damage. 

Primary techniques that are involved in flashing installation

Every DIY roofer should understand the difference between the fundamental roof flashing techniques before proceeding to installation. There are three of them, each covering a specific roof penetration area. 

  • Step flashing. This flashing technique is applied in places where the roof meets a projection, like a dormer or a wall. These areas are potentially dangerous as water could flow down the wall and seep into the shingles, ruining the underlayment. Step flashing is a surefire way to direct water into the rain gutter system, avoiding accumulation near the existing projection. According to this technique, flashing is installed in steps, with shingle layers between.
  • Counter flashing. This technique is often used to seal the area around chimneys. It requires two sheets of metal flashing - one is placed around the bottom of the chimney, and another one is embedded into the chimney's masonry. This flashing should sit over the base flashing to ensure no water can penetrate it. 
  • Plumbing vent boot flashing. This flashing technique is required to seal the area around the vents. It constitutes a cylindrical piece of flashing that forces water to run around the vent, not penetrating the roof underlayment. According to this technique, shingles are mounted over the base or boot. 

How to install roof flashing?

The principle of installing and replacing roof flashing is identical and requires the same set of tools. To get the job done, find the following:

  • hammer
  • step flashing
  • corner flashing
  • roofing caulk
  • tin snips
  • roofing caulk
  • galvanized nails

You may apply different techniques depending on which type of flashing is being used. Their specific might vary, but the main principle is the same. In this guide, the step flashing is taken as a basis. 

Below you will find a step-by-step guide on what should be done to install roof flashing without professional assistance.

  • Install the underlayment. Both the underlayment and flashing should be placed under the shingles. That means if you're replacing your flashing, you should first remove the existing layer of shingles.
  • Install corner flashing. The second step is to lay down the corner flashing to build up the step flashing from the bottom up. You can adhere it to the wall with roof cement. 
  • Mount the first shingles. The initial layer of shingles should be placed over the starter strip and secured with galvanized nails and roof cement. 
  • Put shingle layers over the flashing. Place shingles over the first step flashing and cover the seams. Then repeat the previous steps until you reach the roof's top. 
  • Fit the flashing at the roof's peak. You need to cut the existing flashing to ensure it fits the shingles and the roof's peak. The only custom approach can guarantee a seamless look and watertight installation.
  • Finish covering flashing with shingles. Your flashing should be partially covered with shingles and siding by the end of the installation. Ensure your siding is in good condition and lays smoothly over the newly-installed flashing.

Use MyHomeQuote To Hire Local Roofing Companies

Invest in roof renovation to ensure your building's structural safety and enhance its curb appeal

REQUEST A QUOTE
Use MyHomeQuote To Hire Local Roofing Companies

Why hire a certified expert to install roof flashing?

The installation of flashing is not a process you can accomplish without vast knowledge and expertise. You should know the best flashing techniques, building codes, and safety requirements to do the job right. Unless you possess enough experience in roofing work, you can make many rookie mistakes that will have a bunch of negative consequences. A DIY flashing installation project may result in bigger spending on roof restoration from moisture damage. Besides, in neglected cases, water may penetrate inside the house, ruin your attic and cause mold, mildew, rot, and pest infestation. 

Don't make your house susceptible to the elements. Hire a certified roofing contractor to weatherproof vulnerable areas of the roof with the right type of flashing. Explore MyHomeQuote's network of roofing experts and compare their estimates to decide on the company or individual contractor who fits the bill.


Sought-after home repair services near you

Roof repair & restoration

Roof repair & installation

The lion's share of the house remodeling cost should go for roof restoration

Windows restoration & repair

Window replacement & repair

Homeowners should keep a close eye on their window efficiency

Solar systems installation

Solar panels installation

Going solar should be an ultimate part of any major home renovation project

HVAC Installation & repair

HVAC Installation & repair

Install an advanced HVAC system to improve your home's air quality

Bathroom remodeling & maintenance

Bathroom remodeling & maintenance

Add to your house value by updating the look and functionality of your bathroom

Kitchen remodeling & maintenance

Kitchen remodeling & maintenance

Consider a kitchen remodeling to make it more welcoming and comfortable

Gutters repair & installation

Gutters repair & installation

Keep the gutter system in mint condition to prevent any damage to the integrity of your home.

Flooring installation & repair

Flooring installation & repair

Install new flooring to enhance your home's appearance and add extra value to it

Siding installation & repair

Siding installation & repair

Replace the exterior siding to spruce up your home's curb appeal and increase its sale value

Walk-in tubs installation & repair

Walk-in tubs installation & repair

Equip your home with a walk-in tub to enjoy improved safety while taking a bath

WE DON'T SEND THE NEWS

GET THE ESSENCE OF RELEVANT HOME
IMPROVEMENT TOPICS IN LESS THAN 5 MINUTES

Please enter a valid email
Thanks for joining our homeowners’ community.

Thanks for joining our homeowners’ community.

Stay tuned!